Restoration Part 1
Initial inspection
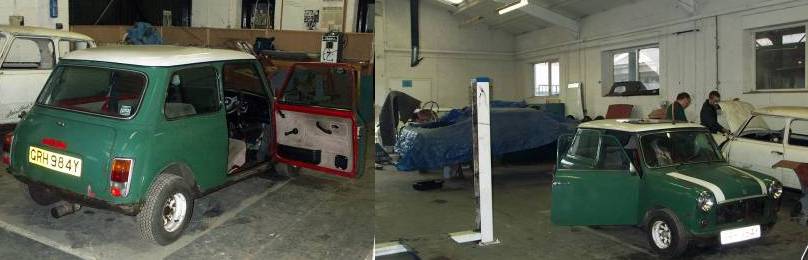 The car was restored as my project on an ASET Vehicle restoration course at Bishop Burton College, Beverley, East Yorkshire. Week 1 was taken up with administration H&S etc. The work below was carried out on Thursday and Saturday of week 2. (The course runs on Thursday evenings and alternate Saturdays). The Tutor was Kevin Brown who at the time also ran East Yorkshire Morris Minors a restoration company specialising in guess what ....
The car was examined on the ramps prior to carrying out any work. I decided that I would start at the rear.
On examination I found the following:
- The rear edge of the boot floor was corroded and would need a piece welding in.
- The piece would also have to include each side up around the subframe mountings.
-
The battery box drain hole had started to enlarge itself. A repair piece would need to be fabricated.
- The rear valance would need replacing, a new valance would be used.
-
The rear panel bottom lip where it joins the boot floor would need replacing, a new panel would be used.
Looking how the panels were fitted we found that they all had a similar flange that fitted together forming the mounting lip for the rear bumper that is 3 layers thick.
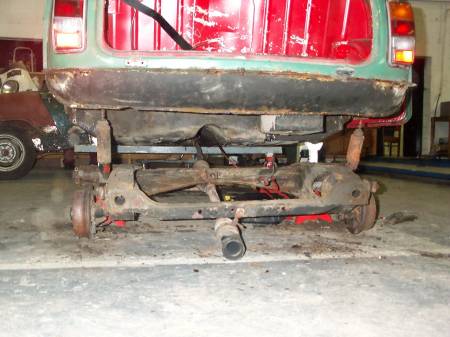
Before any work could take place the car was made safe by removing the battery and removing the petrol tank. At the same time the boot lid was removed to ease access. The car was then jacked up and put on 4 substantial axle stands.
In order for the welding to take place the rear subframe would need to be removed this involved the following steps:
- Disconnect and remove the handbrake cable.
- Disconnect the rear exhaust mounting.
- Undo the top shock absorber bolts.
-
Undo the eight subframe mounting bolts.
-
Cut the rear brake pipe (new ones will be used)
The subframe was then removed from under the car.
The subframe was then stripped of all the suspension components. It involved the following actions:
-
Remove the exhaust bracket and brake pipe 3 way junction.
-
Remove the suspension trumpets and rubber springs.
- Remove the trailing arms complete with brakes
In order to do this I had to learn how to use the oxyacetylene gear as I had to heat up the back of the trailing arm mounting on the subframe as the bolts were rusted. (Kevin said heat the mount not the bolt heads, as they would shear if they were heated).
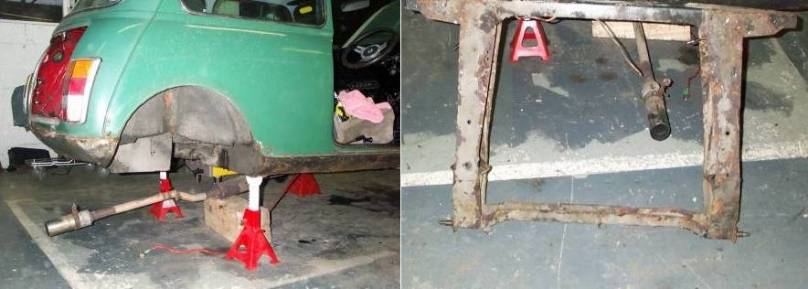
I nearly threw away the rear mounting bracket and bushes as I thought they were part of the subframe. They were removed when I discovered the nuts under a couple of inches of soil in the rear corners of the subframe. A new subframe will be used.
My Mini Mayfair
Restoration
- 1 - Initial Inspection
- 2 - Boot Floor 1
- 3 - Boot Floor 2
- 4 - Boot Floor 3
- 5 - Rear Valance
- 6 - Body Stands & Engine Removal
- 7 - Front End Removal
- 8 - Bulkhead 1
- 9 - Bulkhead 2
- 10 - Sills 1
- 11 - Sills 2
- 12 - Sils 3
- 13 - Sills 4
- 14 - Footwell
- 15 - Floor
- 16 - Battery Box
- 17 - Underside
- 18 - Underside protection
- 19 - A Panels
- 20 - Wings & Front Panel
- 21 - Front Panels & Arches
- 22 - Rear Subframe
- 23 - Return From Paint
- 24 - Brakes
- 25 - Wiring
- 26 - Engine 1
- 27 - Engine 2
- 28 - Fitting Engine
- 29 - Interior, Glass, Lights
- 30 - Wheels & Tyres
- 31 - Finishing Touches